Friday, January 18, 2013

DIY Recording: Part 2

This is a follow up to our DIY recording post here.

We hope to use these posts to help any aspiring bands like ourselves maybe get a little bit further in their recording. This is just what we're using. I'm sure there are other options out there but here's what works for us at the moment. Since our initial purchases from the first post, we realized we had to make some investments if we wanted to get decent home recordings. We also made a few purchases that we wanted to make as opposed to had to. : )

Here's what we've added:

Let's start with the "wants" vs. "needs" (arguably)...


Mike, our drummer decided he would upgrade from the lime green Ludwig set he was on to a new PDP X7 series in red/black. This is a very nice improvement. The low end packs a lot more punch and the extra toms give some more versatility. In all, the set sounds a lot better.


Next up was Aaron on Bass with a new Fender Bassman TV 10 150w 1x10" Bass Amp. Compared to the Fender guitar amp that was being used, this is a huge improvement. Despite going from 2x12" to 1x10" this packs a much bigger punch. The tube amp in here gives it a rich tone as well. This amp also has an XLR out which helps with the recording side of things (more below). This is hard to find at the moment but you can probably find one used. 

And last but certainly not least...


Seth, lead singer and guitarist, bought a new baby. A Gibson Les Paul Studio Deluxe in vintage sunburst. I think that's enough to say about that. A real quality guitar with excellent sound.

On to the recording side of things and the "needs".

We presently have 3 members using the studio so we figured out that we could each spend about $200 to move us along to where we needed to be:

Purchase 1: Studio Monitors


We went with a pair of Behringer Truth B1030a Active 2-Way studio reference monitors. We found that what we were hearing during playback in the studio and what we were hearing at home or on another device was vastly different. This made leveling tracks very difficult to get right. The studio monitors throw out a much truer sound to help with leveling. The 5.25" Kevlar woofers on these hold up really well. These are easy to set up on any device with a variety of jacks available. If you like to crank it up like we do however, you may find the little red overload light on frequently so you might want a bigger set.

Purchase 2: Audio Interface


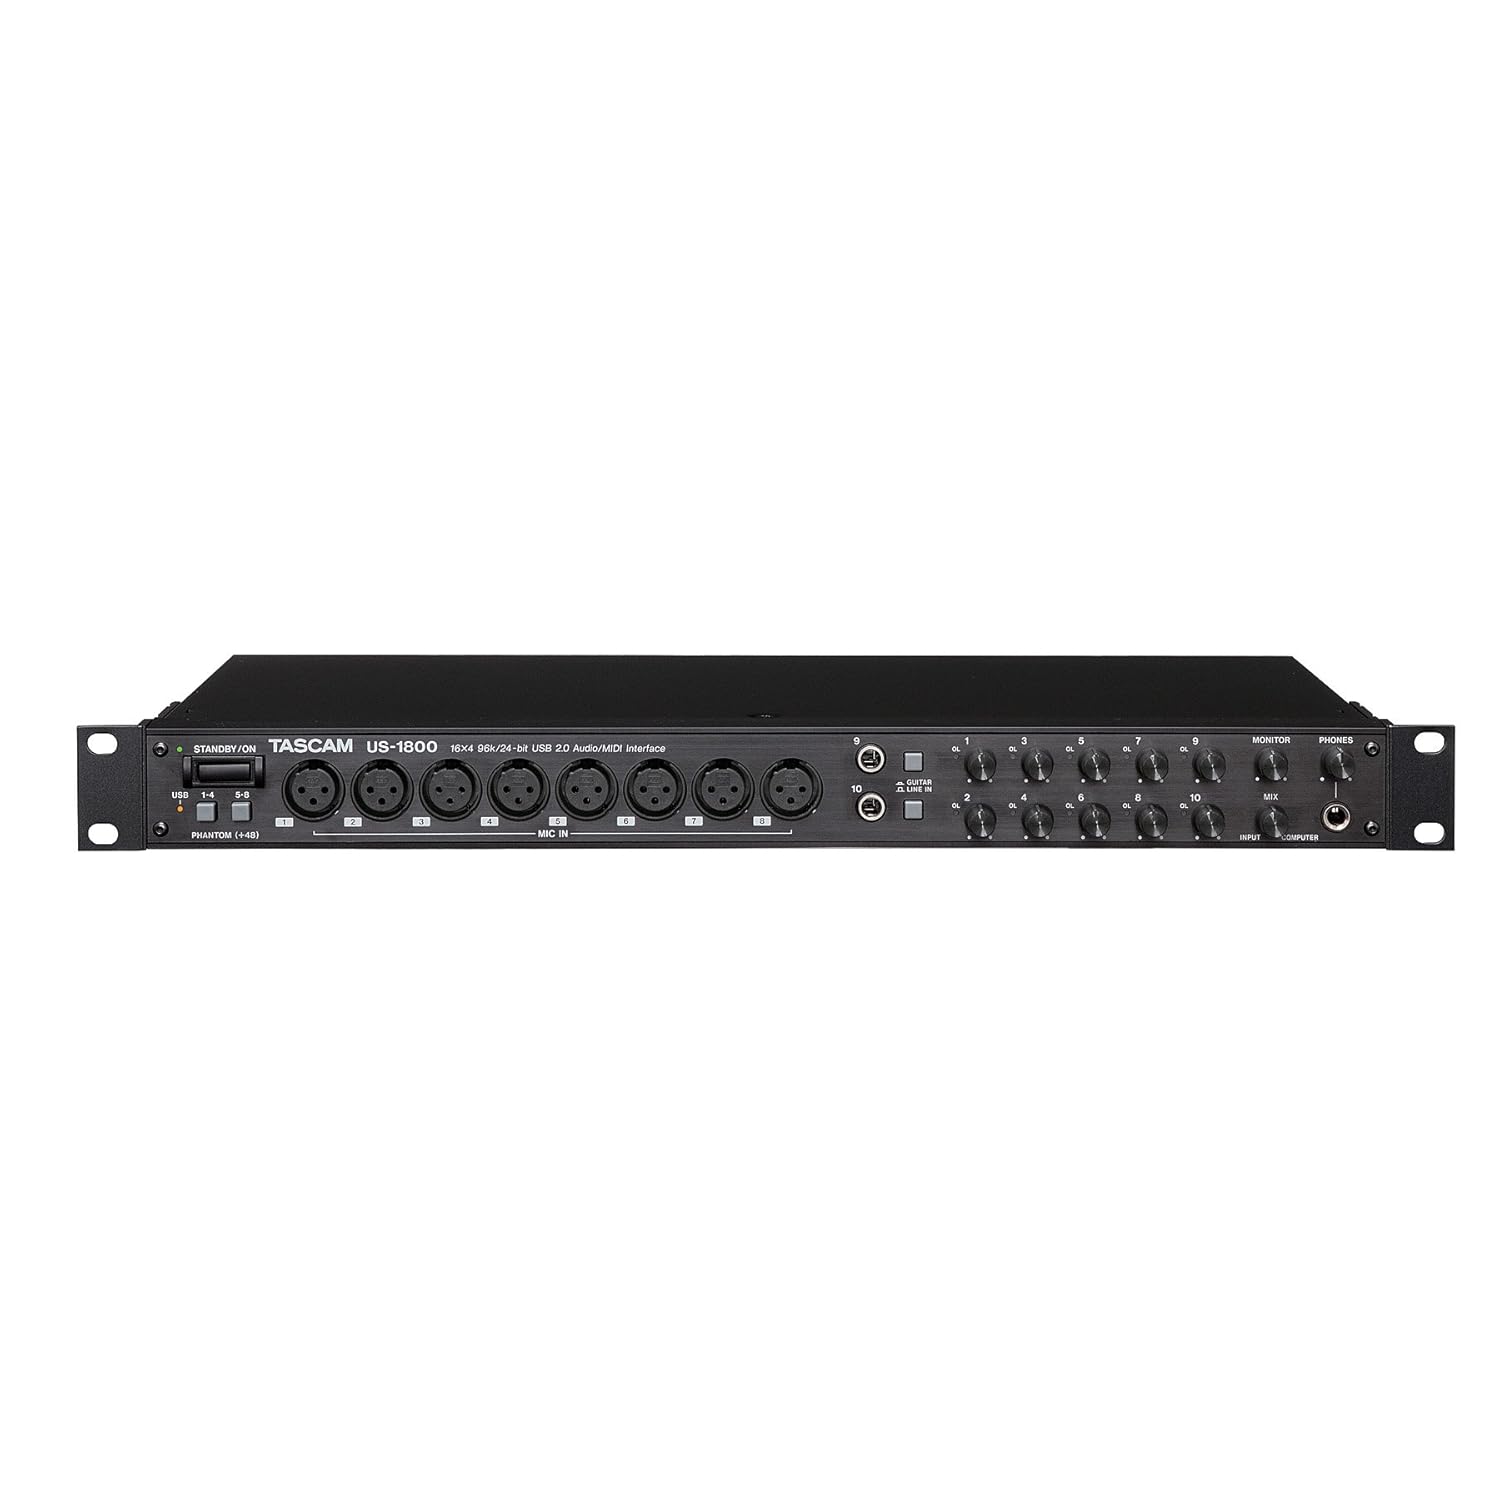
This is probably the most important of the 3 "need" items. We were finding that with our 8 channel mixer, we were quickly running out of inputs. On top of that, with the mixer setup we couldn't individually level tracks in post. After some research, we found the TASCAM US-1800. This 16-in / 4-out USB interface has 8 XLR and 8 1/4" inputs as well as MIDI, Phones, digital and balanced line outs. Most importantly this interface features a USB interface with compatibility to Cubase (LE5 version included) or ProTools recording software. The Cubase software included does have a bit of a learning curve and some installation hiccups (There may only be a 30 day trial version included as the LE5 goes, or it could just be us. There's some tricky USB dongle emulation nonsense DRM with this that was tricky to work out. We upgraded to Cubase 5 full and avoided the problem.). Once we got the learning curve down however, Cubase is a versatile and useful tool that combined with the TASCAM, allows 16 channel simultaneous recording with the ability to adjust each channel individually in post or on the fly. 48 channels total are allowed in Cubase so that should meet most band's needs.


Purchase 3: Drum Mics


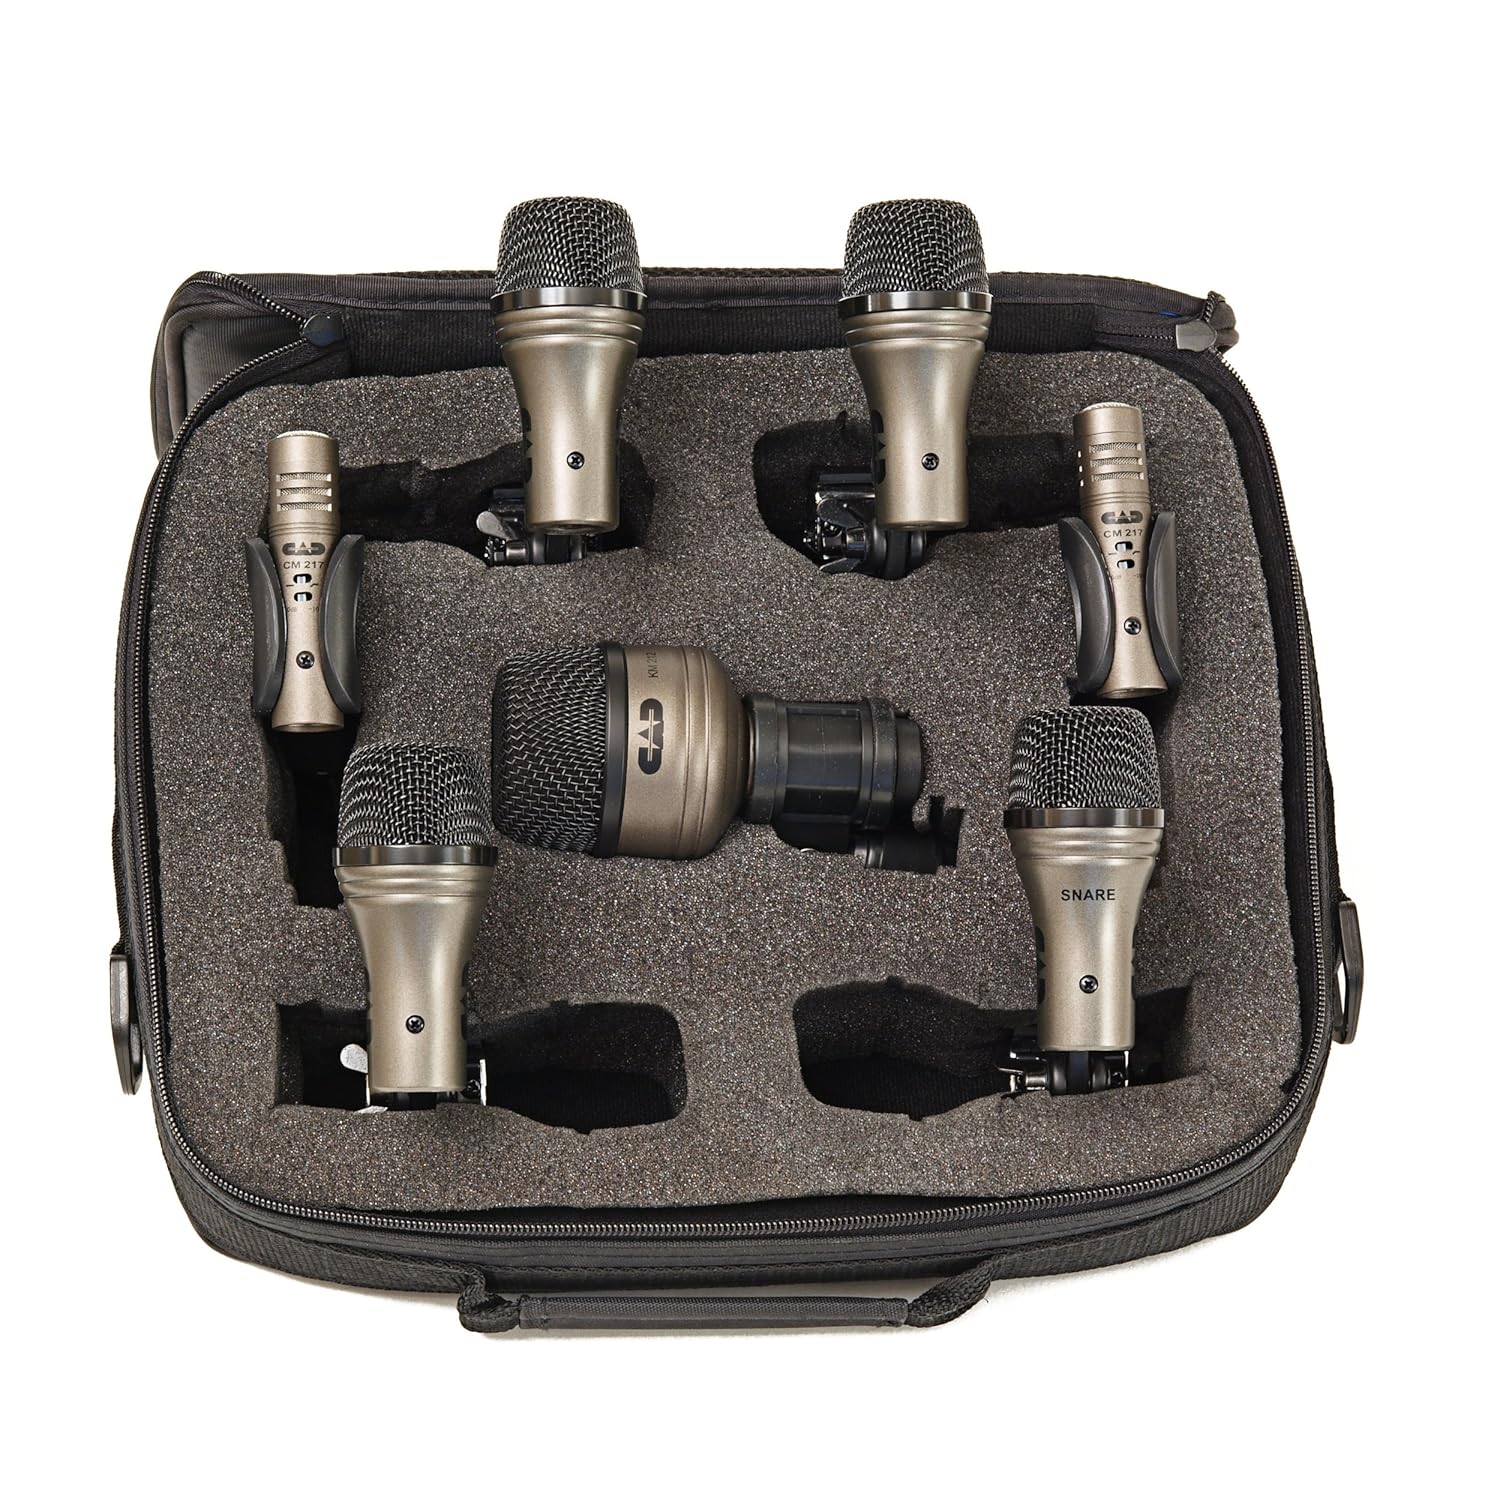
On our initial recording, we were using 1 mic to get all of the drums. Needless to say, this left a lot to be desired. This typically left us with a lot of high end (read: cymbals) and not much else. We picked up 10 CAD Drum Mics. This also required us to purchase a bulk pack of XLR cables on ebay. We can adjust the levels on each drum now and get the audio just right.

So here's the setup:


We have 5 XLR inputs on the TASCAM dedicated to the Drums: Snare, Kick, Toms 1&2, Toms 3&4, and Overhead.


We played around a lot with mic placement to try and figure out how to get the best sound from each component and this was the setup that worked best for us without using all of the XLR ports.


XLR 6 is the Bass, 7&8 are vocals, and input #9 is 1/4" for guitar. Input #10 can be used for the second guitar when we have it. There are also the 6 additional 1/4" balanced inputs in the back. We use 2 of the 1/4" outputs to run into the mixer and out to headphones and our studio monitors.

And that's basically the setup. We record master tracks using all of the inputs simultaneously then go back and re-record anything we want separately (typically vocals to get rid of the background). We tried laying down tracks individually as with the mixer but for timing, it's much easier to go all at once. To record over, we turn off the monitors and use headphones for playback for whoever is re-recording. With Cubase, we set up our input channels and EQ, reverb etc.. for each instrument and saved a base template that we can use to record whatever. You can monitor any channels you want live while recording and we usually monitor vocals as it helps everyone stay on track and on pitch. If anyone is curious, we're using an AMD A8 Quad Core Windows 7 Laptop with 8GB of RAM. You could probably get away with any fairly recent computer with a decent amount of RAM.

2 major tips:

  1. Cable management: make sure you use cable ties and wraps (Velcro is preferred) to keep your cables neat and organized. We use a bit of tape and a sharpie to label all of our cable ends as well. This makes sure if you need to move cables or if you have any go bad (we have), you can get them moved easily.
  2. Recording Levels: Adjust your levels as best you can before you record. Make sure each instrument is loud enough without clipping in Cubase. The TASCAM has volume controls on the front for input 1-10. Also make sure that you record in Cubase with the Master volume Maxed Out! You can always turn stuff down, but it's difficult to get more volume without distorting the audio. By the time we export our songs to WMA lossless then MP3 (Cubase has a direct MP3 if you want to pay for it) the volume on certain items (mostly bass and kick drum) has reduced by a good bit. 

We hope that helps anyone looking to DIY record. If you have any questions, comments, tips, or products you prefer, let us know in the comments below.

A few additional links:
Free Audio Converter

And if you would like to hear what our setup sounds like, you can check us out on ReverbNation.com. (Focus on the quality of the recording vs the quality of the songs ; ) )

Like us on Reverb or Facebook and we greatly appreciate it!!!

Sunday, September 9, 2012

DIY Recording

Every band dreams of catching some big break and having some record producer hearing one of their crappy recordings and sweeping them up for a major record deal. I would gather, more often than not that isn't going to happen. It hasn't happened for us yet. So we're going to post some tips out there as we go along for anyone who wants to have some idea of the problems we've run into and the tricks we've figured out. So here we go...

"The Studio"

After practicing for a while in a 10'x12' bedroom in my house, we moved up to my "man-cave" for a little more space. I don't know the exact dimensions of the room but it is definitely bigger. We put the drums up against the window so the angled ceilings don't get in the way.


One of the first purchases we made for the studio was some studio foam. In the smaller bedroom we got a lot of junk sound from the walls so we decided to see if this would help. It definitely makes a difference. This set was on sale for $60 when we bought it and we plan on getting more if they go on sale again. 32 panels seems like a lot but they can go fast. The one downside is that you need to plan on using the provided caulk to adhere these to the wall. I haven't seen what kind of problems that means if you want to take one off. You can see how the tiles are laid out in some of the other pictures.
http://www.musiciansfriend.com/accessories/auralex-studiofoam-designer-kit


Here's the studio foam on the wall behind the drums. 

Upgrades
Our initial recording setup was about as bare bones as you could get. We were using the free, open-source recording software, Audacityhttp://audacity.sourceforge.net/ This hasn't changed except we do have CakeWalk Sonar X1 still yet to play with. http://www.cakewalk.com/products/sonar/X1-Producer/ The computer setup was just a Windows 7 based PC from a few years ago. The Microphone was a USB Logitech mic (borrowed from my Rockband kit... really). And that was about it. We just recorded the live audio from the room with the Mic in the middle somewhere. We picked up way too much drums/cymbals and had no way to adjust the levels for each instrument so...

We gradually started adding stuff to our setup. It kind of all snowballed but here's our initial gear changes.


Behringer XENYX802 Mixer - Probably the most crucial piece in getting a better recording. This allowed us to record individual instruments. We also use this when we're just jamming to record everything all at once. The guitars and mics all feed in and we put a few mics around the drums. It usually leaves the drum a little quiet, but compared to what we were getting it works well. This is good for recording sessions where you just want to get some riffs down or song structure, etc...


PC Setup - I'm using an older (Windows 7 launch) HP desktop with a second monitor setup for viewing lyrics and song structure, etc... For speakers we just have some standard Logitech 3 piece speakers and the second monitor's speakers.


We're trying to stay wired as much as possible so we can all stay in the loop. We're using Microsoft OneNote for lyrics as well as Google Groups and Google Docs to share files with each other. We also use Box.com and Amazon MP3 to share songs.

Here's the rest of the setup:

Guitar/Lead vocals:


Shure SM58 Microphone - This is a standard in the industry. They range from $75 - $100 typically but they're durable and high quality so they should last. Good for live performances and more than ok for recording. We have one of these for the backup vocals as well.


Guitar & Amp - "Vintage" Slammer Hamer Stratacaster body type: The first and only guitar purchased so far. Cheap but it works. New Boss ME-70 guitar pedal: This is a digital effects pedal with everything you need including tuner, distortion, WahWah pedal, looping and the like. This was about $300. Acoustic 150w guitar amp: acoustic brand, not type. Decent amp with plenty of settings, adjustments, plugs, and built in effects. $150 - $200. Basic mic stand, a few spare Boss analog pedals for distortion and overdrive, cables etc...


Bass - Original Bass is an Encore brand pawn shop bass: free to me (Thanks Corey!), short neck, has some shorts in the knobs. The short neck means there's less punch in the bass. New bass is a Schecter Omen Extreme 5 string. This one has active pickups and the 5th string for a lot more low end. $450 Fender FM-212R amp: This is a decent guitar amp and It works well enough for bass. Depending on who you ask, using a guitar amp with a bass could either ruin the amp or blow it out, etc.. so just be forewarned. $250 used for the amp and the pedal board (below).


Bass Pedals - Technically I don't have any "bass" pedals. Here's what I've got: Boss DS-1 distortion pedal $20 used. Behringer 3 pack: Tuner, distortion (3 types), and delay. $50/set. The board is a Boss BCB-60. It was included with the amp. Reg $150


Drums - Ludwig 5 piece set with a double bass pedal and Zildjian cymbals. Custom bright green glow in the dark covering.

For the recordings with the mixer we have each instrument running in as well as the Mics and a couple of mics on the drums.  We can either record everything at once for a master track or record each instrument at a time. We typically record the drums first because a. it sets the tempo for the song. and 2. It's difficult for the drummer to hear the other recordings while drumming.

That's about it for this time. We'll get into the equipment we've upgraded to and the changes we've made to how we record.

Feel free to leave any questions in the comments and subscribe.

Thursday, May 17, 2012

Taking Names

Origins of our Accents - Many people ask us where our name came from. No we did not pull it out of nowhere. Here's the story:
After playing for a couple of months, Corey and I decided it was time to name our band.  A few ideas were tossed around such as Deviled Eggs, Kiwanis Love, and Grundel Punch.  I still have the full list.  But none were agreed upon due to being too graphic, too funny, or too “small town” sounding.  At the same time we had been looking for a bassist, and I had found a profile on Facebook of a girl holding a classic Buddy Holly blue fender bass with the usual rock pose.  I sent a message letting her know who we were, and that we were looking for a bassist to be in a new rock band.  She was willing to come over and see if we could play together.  A few days later she knocks on the door of my 400 sq ft apartment, and we’re ready to jam.  Corey heads to the bathroom while me and the bassist make small talk.  “Where are you from,” she says.  “From the South,” I reply with my standard answer to this question.  “You don’t have a southern accent,” she questions.  “Too much TV I suppose,” I laugh.  “You know, they say that’s a sign of intelligence – being able to turn an accent on and off,” she replies.  Corey returns and we begin to play.  We play “ICU” together, preview the next song we were working on, and she shows us a tune she had been working with my acoustic guitar.  She leaves and we feel ok about the encounter – not exactly the same style, but she’s good.  I tell Corey the interesting fact that she had mentioned earlier about accents and he replies, ”That’d be a good name.”  “What’s that?” I ask.  “Accents of the Educated.”  We never heard from the bassist again.

-Seth

Tuesday, March 27, 2012

And So It Begins...


January 28th. Our first concert.  The German family was kind enough to invite us over to their homes, and let us play our music for them and their friends.  We really appreciate everyone who came out and listened to us.  We know it wasn't everyones taste, but the encouragement was huge and meant a lot to us.  We are really happy with the way the evening turned out.  We counted roughly 30 people in the crowd.  Pretty good, I’d say, for a first show.  The set lasted an hour, which was surprising and relieving at the same time.  Johnny G. rounded out the night with some great DJing.  The songs went well overall, and it was a great learning experience.  We're going back into the studio to start on some new songs, and review our current ones.  We're already in the process of setting up our next shows, so keep watching and listening for their date and times.  Thanks again for your support!  You're the reason we're here.  - Seth